Export and Import your Onetastic Settings
March 22, 2026
Whether you're setting up a new computer, sharing your OneNote workflow with a colleague, or just keeping a backup of your carefully tuned setup, you've probably wished there was an easy way to carry your Onetastic configuration with you. Today that wish becomes reality: Onetastic now lets you export and import your settings in a single file.
What Can You Export and Import?
The feature covers everything that makes your Onetastic experience yours:
- Macros: all your installed macros, ready to run on another machine
- Custom Styles: your formatting styles so your notes always look just right
- Keyboard Shortcuts: the key combinations you've configured for one-click access to your favorite features
- Favorites: your pinned favorite pages, instantly available after import
- Display Settings: your ribbon button visibility preferences and other display options
- Macro Editor Settings: your editor preferences such as font and color theme
You don't have to export everything at once. Each category is a separate checkbox, so you can pick exactly what you want.
Getting Started
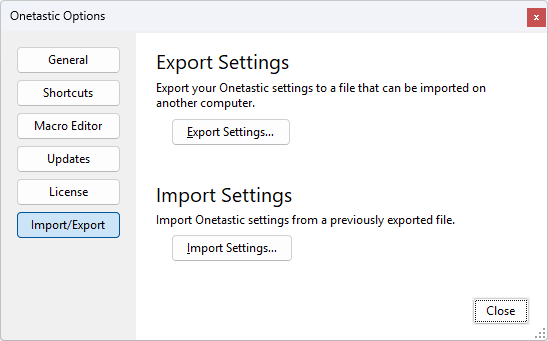
To export or import your settings, open the Onetastic Options dialog via Tools and Settings > Onetastic Options in the Home ribbon tab. Then switch to the Import / Export tab.
Note: Import and Export are available to Onetastic Pro subscribers. If you don't have an active Pro license, the tab will display a link to upgrade.
Exporting Your Settings
Click Export Settings to open the export dialog. You'll see a checklist of every setting category that has content in your current installation. Categories with nothing to export are not shown, so you only see options that are actually available.
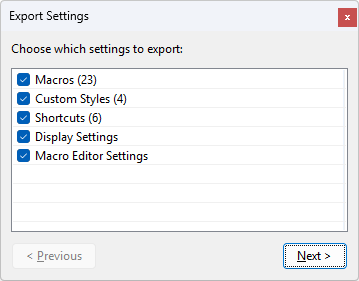
Check the categories you want to include and click Next. You'll be prompted to choose a location and file name for the export file. Onetastic writes a single .xml file that contains each selected section encoded inside it. You can save this file to a USB drive, cloud storage, or email it to a colleague.
Importing Your Settings
Click Import Settings, then pick the .xml file you previously exported. Onetastic reads the file and immediately shows you what's inside.
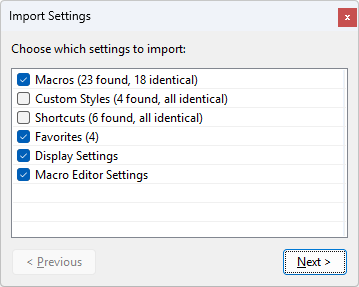
The list shows every section that was exported, along with a count of how many items it contains. If some of those items already exist in your current installation, you'll also see how many are new versus identical:
- Macros (23 found, 18 identical): 23 macros in the file, 18 are already installed and unchanged
- Custom Styles (4 found, all identical): every style in the file is already present; this section is automatically unchecked for you since importing it would change nothing
If everything in a category is identical to what you already have, Onetastic unchecks it automatically so you won't waste time importing something that won't change anything.
Select the categories you want and click Next to proceed.
Dealing with Conflicts
When the items you're importing conflict with something you already have, Onetastic doesn't silently overwrite your data. Instead, it shows you exactly what conflicts exist so you can decide.
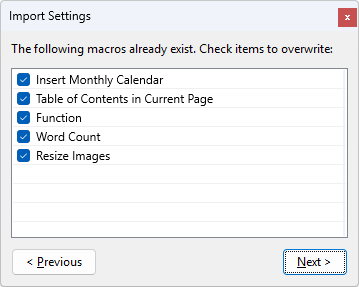
Each conflicting item is listed with a checkbox. By default all conflicts are checked, meaning they'll be overwritten. Uncheck any item you want to keep your existing version of. When you're happy with the selection, click Next to apply.
If there are conflicts across multiple categories, Onetastic walks you through one conflict page per category. You can use Previous to go back and adjust a decision at any time, and your checkbox selections on each page are preserved as you navigate back and forth.
Content-Aware Conflict Detection
Onetastic checks each item's contents to make sure items that are already up to date aren't presented as conflicts. For example, if a macro in the export file is the same as one you already have, Onetastic counts it as identical and skips it automatically. You won't be asked about conflicts that aren't really conflicts.
Import Summary
After importing, Onetastic shows you a clear summary of what happened:

For each category you chose to import, the summary tells you:
- How many items were imported (new items that were added)
- How many were skipped because they were identical (already up to date)
- How many were skipped because you unchecked them in the conflict page
For Display Settings and Macro Editor Settings, the summary simply confirms they were applied.
Practical Use Cases
New computer setup: Export all your settings on your old machine. On the new machine, install Onetastic and import the file. Your macros, styles, shortcuts, and favorites will be there in seconds.
Sharing with a team: If your team uses the same set of macros or custom heading styles, one person can export and share the file. Everyone imports it and is instantly working with the same toolkit, without anyone having to install macros one by one from Macroland.
Backup before a clean install: Export everything before reformatting. Import after reinstalling Onetastic and OneNote. Nothing is lost.
Selective sharing: Because each category is independent, you can export just your Macros and Shortcuts to share with a colleague without exposing your personal Favorites or Display Settings.
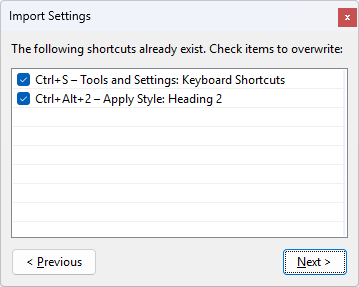
A Note on Keyboard Shortcuts
When you import keyboard shortcuts, Onetastic lists each one with both the key combination and what it does, for example Ctrl+Alt+H — Insert Horizontal Line. This makes it easy to spot duplicates and decide which ones to keep when your key assignments differ from the ones in the file.
Try It Today
Import/Export Settings is available now in the latest Onetastic update. Open Onetastic Options, head to the Import / Export tab, and give it a try. As always, if you have questions or run into any issues, join the discussion below or reach us out via email.
Also in This Release: Import Printouts as Background Images
This update also brings a highly requested improvement to Onetastic Batch File Import. When importing PDFs, Word documents, and PowerPoint presentations as printouts, you can now have them placed as background images in OneNote.
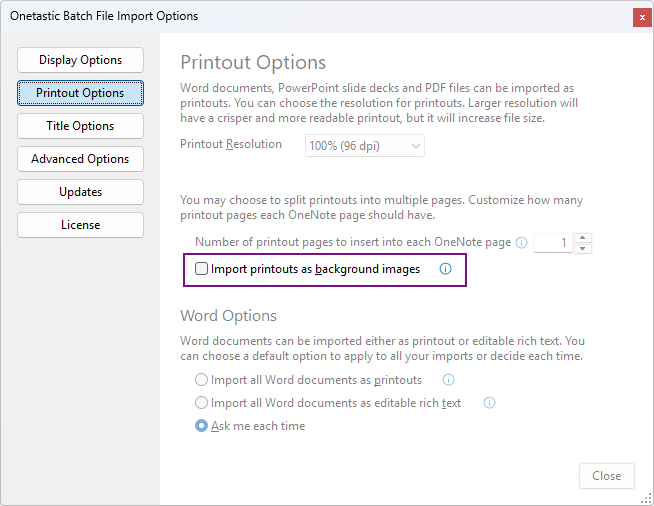
By default, printouts are placed as regular objects on the page. This works well for viewing, but if you try to ink on top of them, you may accidentally grab and move the image instead of writing on it. With the new Import printouts as background images option, the printout is pinned to the page background so it stays in place while you ink freely on top, exactly the way OneNote's built-in "Set Image as Background" setting works.
To use it, open Batch File Import and go to Options. Under the Printout Options section, check Import printouts as background images before running your import.
Note: This option requires an active Onetastic Pro license.
Comments