Upgrade Your Macro Dialogs
May 03, 2026
Macro dialogs are one of the most powerful features for interacting with Onetastic macros. They let you create custom prompts, collect information, and present options without any GUI programming knowledge. With this update, we have added several significant enhancements that make dialogs even more flexible and user-friendly.
Dynamic Control Values: Respond to User Input in Real Time
One of the most requested features has been the ability to change dialog controls based on what the user does. Now you can do exactly that with the new DialogBox_SetControlValue function.
What Can You Change?
You can now dynamically update the content of several control types while the dialog is open:
- Text fields: Change the text a user has entered or pre-fill it with new content
- Labels: Update the text displayed in a label to provide feedback or instructions
- Combo boxes and dropdowns: Change the available options to choose from
- Radio buttons: Update the options in a radio group (keeping the same number of choices)
- Check boxes: Toggle the checked state
How It Works
Use the DialogBox_SetControlValue function inside an event handler to update any control:
Copied!
function Main($arg, $context)
$d = DialogBox_Create("")
DialogBox_AddTextBox($d, "Name", "nameControl", "", false)
DialogBox_AddTextBox($d, "Greeting", "greetingControl", "", false)
DialogBox_SetEventHandler($d, "OnUserInput")
DialogBox_Show($d)
function OnUserInput($d, $controlName)
if ($controlName == "nameControl")
$name = $d.controls["nameControl"]
DialogBox_SetControlValue($d, "greetingControl", "Hello, " & $name & "!")
This example updates the greeting field based on the name entered. The possibilities are endless: show or hide controls based on selections, update labels with calculations, or populate fields based on previous choices.
Change Available Options
For combo boxes, dropdowns, and radio buttons, you can change the list of available options using DialogBox_SetControlOptions:
Copied!
function OnUserInput($d, $controlName)
if ($controlName == "countryControl")
$country = $d.controls["countryControl"]
if ($country == "United States")
DialogBox_SetControlOptions($d, "stateControl", ["CA", "NY", "TX", "FL"])
else if ($country == "Canada")
DialogBox_SetControlOptions($d, "stateControl", ["ON", "BC", "QC"])
This filters the state options based on the selected country. For radio buttons, the number of options must stay the same, so you update the labels but not the count.
Event Handlers Have Full Control
Event handlers are called whenever the user interacts with a control. This is the perfect place to validate input, update other controls, or provide live feedback. Your handler receives the dialog box and the name of the control that was just changed, so you know exactly what the user did.
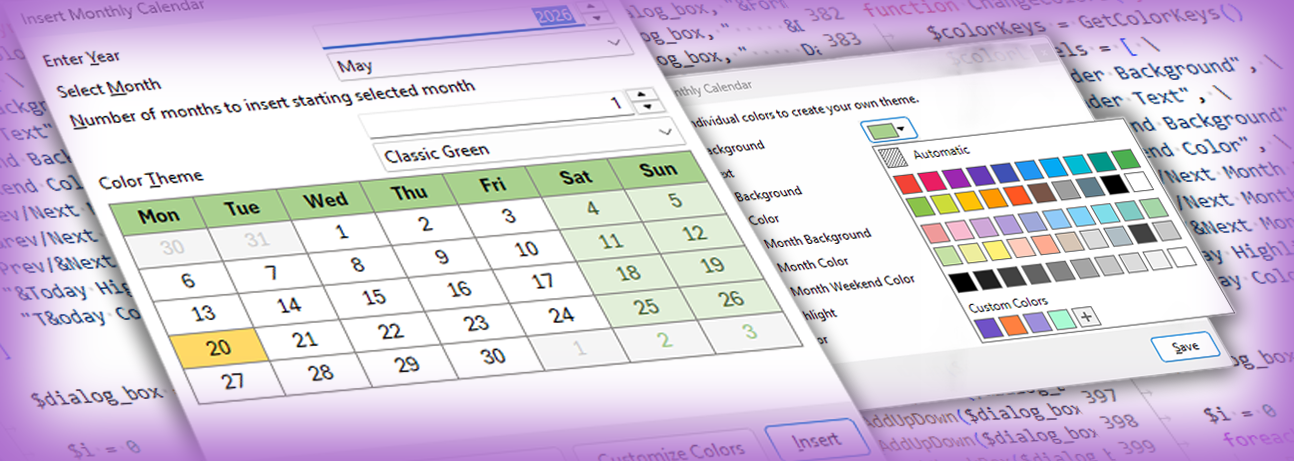
Insert Images as Controls: Bring Visuals to Your Dialogs
Dialogs are no longer limited to text and simple controls. You can now embed images directly as controls using DialogBox_AddImage.
Adding Images
To add an image to a dialog, you need the image data in binary form. In Onetastic, you can extract image bytes from a file or OneNote itself. Here is the basic syntax:
Copied!
$binaryImageData = FileSystem_ReadFromFile("c:\\temp\\image.png", "binary")
DialogBox_AddImage($d, "Image Label", "imageControl", $binaryImageData)
The image data is the binary content of an image file (PNG, JPG, or GIF). Once added, the image appears as a visual element in your dialog.
Scaling and Sizing
By default, if an image is wider than the dialog, it is scaled down to fit. If the image is already smaller than the dialog width, it displays at its original size. If you want to prevent scaling entirely and always display at original size even if larger than the dialog, use the optional scaleToFit parameter set to false:
Copied!
DialogBox_AddImage($d, "Icon", "iconControl", $imageData, false)
This is useful when you want to preserve the exact pixel size of an image, such as an icon or logo.
Dynamic Image Updates
Like other controls, you can change the image displayed while the dialog is open by calling DialogBox_SetControlValue with new image data:
Copied!
DialogBox_SetControlValue($d, "imageControl", $newImageData)
This opens up possibilities for image galleries, photo previews, or dynamic visual feedback based on user selections.
Named Labels for Flexible Text Control
Labels are now even more useful. You can give any label a name and update its text dynamically using DialogBox_AddLabel, or show and hide it based on context, allowing you to display feedback, status messages, or dynamic content.
Creating Named Labels
When you add a label, you can now provide a name so you can reference it later:
Copied!
DialogBox_AddLabel($d, "Click a button below", "statusLabel")
Updating and Hiding Labels
Once named, you can change a label's text from an event handler:
Copied!
DialogBox_SetControlValue($d, "statusLabel", "Processing your request...")
Or hide and show labels based on the user's choices:
Copied!
DialogBox_SetControlVisible($d, "statusLabel", false)
DialogBox_SetControlVisible($d, "statusLabel", true)
This is perfect for status messages, instructions that change based on selections, conditional help text, or displaying results from calculations.
Adding Style to Labels
Labels now support multiple display styles to help you organize and emphasize different text:
- heading: Large, bold text for section titles
- subheading: Medium text for subsections
- normal: Standard body text (default)
- bold: Standard text in bold
- underline: Standard text underlined
- code: Monospace font for displaying code snippets or technical content
Copied!
$d = DialogBox_Create("")
DialogBox_AddLabel($d, "Heading", "headingControl", "heading")
DialogBox_AddLabel($d, "Subheading", "subheadingControl", "subheading")
DialogBox_AddLabel($d, "This is a very long body text that should wrap around to the next " \
& "line when it reaches the end of the dialog box. It demonstrates how the body text can " \
& "be displayed in a way that is easy to read and visually appealing.", "bodyControl", "normal", true)
DialogBox_AddLabel($d, "Bold", "boldControl", "bold")
DialogBox_AddLabel($d, "Underline", "underlineControl", "underline")
DialogBox_AddLabel($d, "This line is styled with a code font", "codeControl", "code", false)
DialogBox_Show($d)
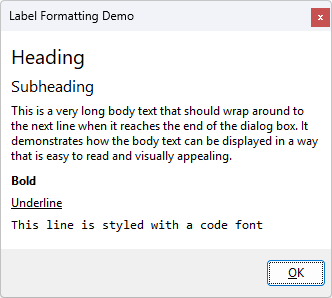
Different styles help you guide the user's attention and organize information clearly.
Improved Color Picker: Pick Colors Faster
The color picker has been completely redesigned to help you select colors more quickly. Instead of always opening a full color picker dialog, you now get a handy gallery of common colors right away.
Quick Color Selection with Material Design Colors
The gallery displays 40 Material Design colors and 10 grayscale colors in a convenient grid. These are professional, well-balanced colors that work great for most needs. Just click on the color you want and you are done. No dialogs or extra steps required.
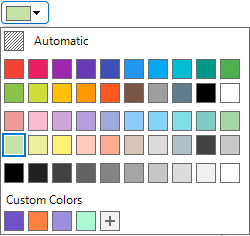
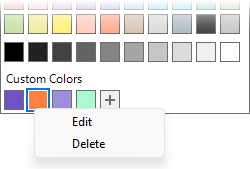
Custom Colors You Use Often
Below the standard colors, the picker remembers the colors you have used recently. Your last custom colors appear right in the gallery, making it quick to reuse colors across multiple dialogs or macros.
You can manage your custom colors directly in the gallery:
- Add a new color: Click the + button to open the full color picker and add a new custom color
- Edit a color: Right-click (or press the Menu key) on a custom color to edit it
- Delete a color: Right-click (or press the Menu key) on a custom color and select Delete
Bring Your Dialogs to Life
These new features combine to give you much more control over how your macros interact with users. Whether you are building a simple prompt, a complex multi-step wizard, or a polished utility dialog with images and dynamic updates, Onetastic now has the tools you need.
Comments in Macro Code: Document Your Macros Inline
In addition to dialog improvements, this update comes with some new syntax for macros. Writing clear, well-documented macros is essential, especially when sharing them with others or revisiting them months later. Previously, Onetastic only supported full-line comments (starting with // at the beginning of a line). Now you have much more flexibility: you can add comments anywhere in your code using inline comments (/* */) and end-of-line comments (//).
Full-Line Comments (Existing)
You could already add comments on their own line:
Copied!
function Main($arg, $context)
$d = DialogBox_Create("Greeting")
DialogBox_AddTextBox($d, "Your name", "nameBox", "", false)
DialogBox_Show($d)
End-of-Line and Inline Comments (New)
Now you can add comments within a line of code to document specific parts:
Copied!
function Main($arg, $context)
$d = DialogBox_Create("Greeting")
DialogBox_AddTextBox($d, "Your name", "nameBox", "", false)
DialogBox_Show($d)
Full Roundtrip Preservation
When you save and reload macros, comments are fully preserved exactly as you wrote them. This means your documentation stays with your code, giving you a complete record of what your macro does.
Multi-Line Statements: Keep Long Code Readable
Long macro statements can be difficult to read when everything is crammed onto a single line. You can now split any statement across multiple lines by ending a line with a backslash ``. The next line is treated as a continuation of the same statement.
Writing Multi-Line Statements
Add a backslash at the end of any line to continue the statement on the next line:
Copied!
function Main($arg, $context)
$result = String_Replace( \
"the original long text", \
"original", \
"replaced", \
false, \
$count)
ShowMessage($result)
The indentation you use on continuation lines is up to you. Only the indentation of the first line of a statement determines which block it belongs to, so you are free to align continuation lines however looks clearest.
Multi-Line Statements Inside Blocks
Multi-line statements work naturally inside loops, conditions, and any other block:
Copied!
function Main($arg, $context)
for ($i = 1, $i <= 5, ++$i)
$message = "Processing item " & \
$i & " of 5"
ShowMessage($message)
Combining with Comments
You can use inline comments on continuation lines as well:
Copied!
function Main($arg, $context)
$result = String_Replace($text, \
"original", \
"replaced", \
false, \
$count)
How It Looks in the Editor
The macro editor displays multi-line statements naturally across multiple lines. Each statement is still treated as a single unit: it is selected, stepped through in the debugger, and executed as one item, even though it spans several lines.
Bring It All Together
Start experimenting with these new capabilities and let us know what you build. If you have questions or suggestions for future improvements, join the discussion below or reach us out via email.
Comments